Using Agent Skills to Automatically Improve your Prompts
Use the Langfuse skill to analyze trace feedback and iteratively improve your prompts.
Did you know you can use an AI agent and the Langfuse skill to iteratively improve your prompts? You annotate a handful of traces in Langfuse, then let the agent fetch your feedback, analyze the patterns, and propose prompt changes. It’s a fast way to get from a rough first prompt to something more robust. It will get you from 10% to 70% before you invest in more structured evaluation like datasets and automated scoring.
We’ll walk through the full loop using an example: a chatbot that searches past GitHub discussions in the Langfuse repository. We’ll use Claude with the Langfuse skill as the AI agent.
Prerequisites
An LLM application with Langfuse tracing set up. If your application is not instrumented yet, you can take a look at the tracing get started page to set it up.
An AI agent with the Langfuse skill installed. You can use any AI agent, we’ll use Claude with the Langfuse skill in this guide (which uses the Langfuse CLI under the hood).
Your prompt managed in Langfuse Prompt Management (optional). This lets the agent fetch and update your prompt directly, and links prompts to traces automatically. See the Prompt Management setup guide and linking prompts to traces.
Context on the Workflow
Before diving into the walkthrough, here’s a quick overview of the workflow and the example application we’ll be using.
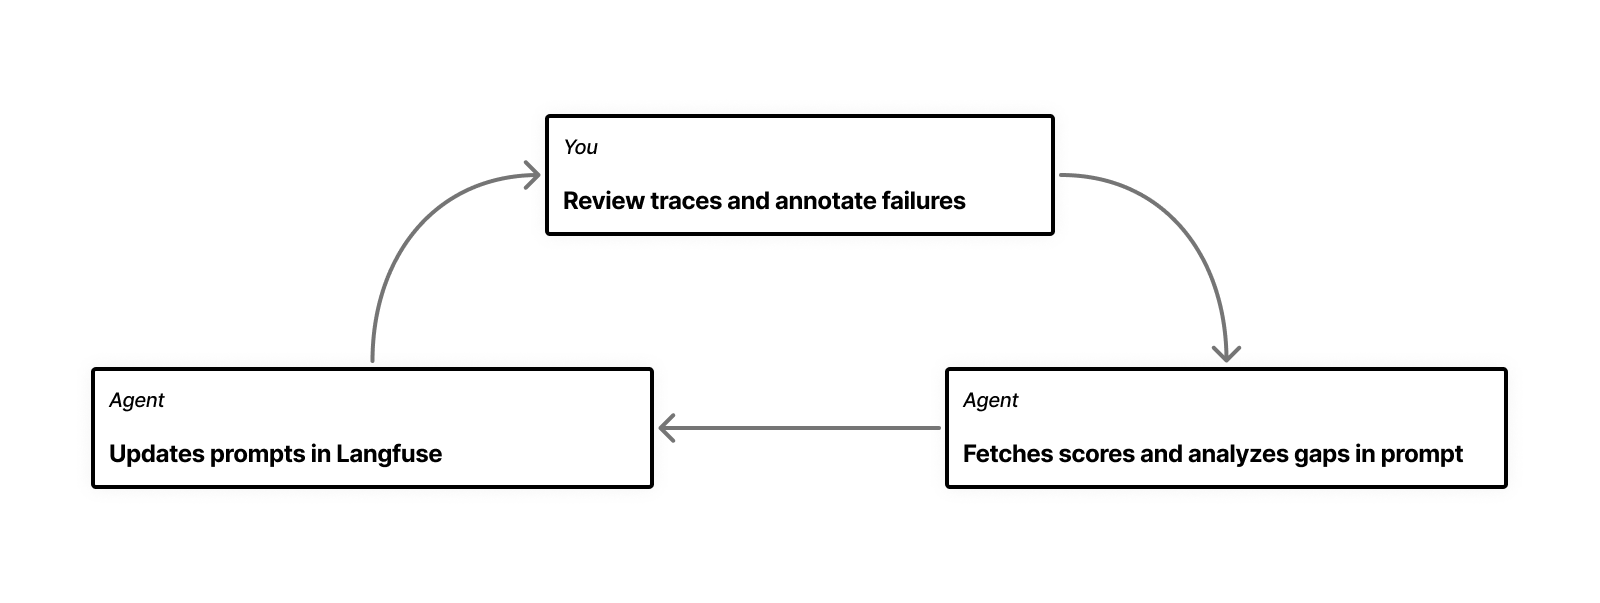
The Concept
The workflow is a loop with three steps: you look at traces, annotate the ones that are off, and then hand your annotations to an AI agent that analyzes them and updates the prompt. Then you run the app again and repeat until the obvious issues are gone.
The Example Application
We’re using a chatbot that searches GitHub discussions in the Langfuse repository to help users find whether their bug or feature request has already been in the past.
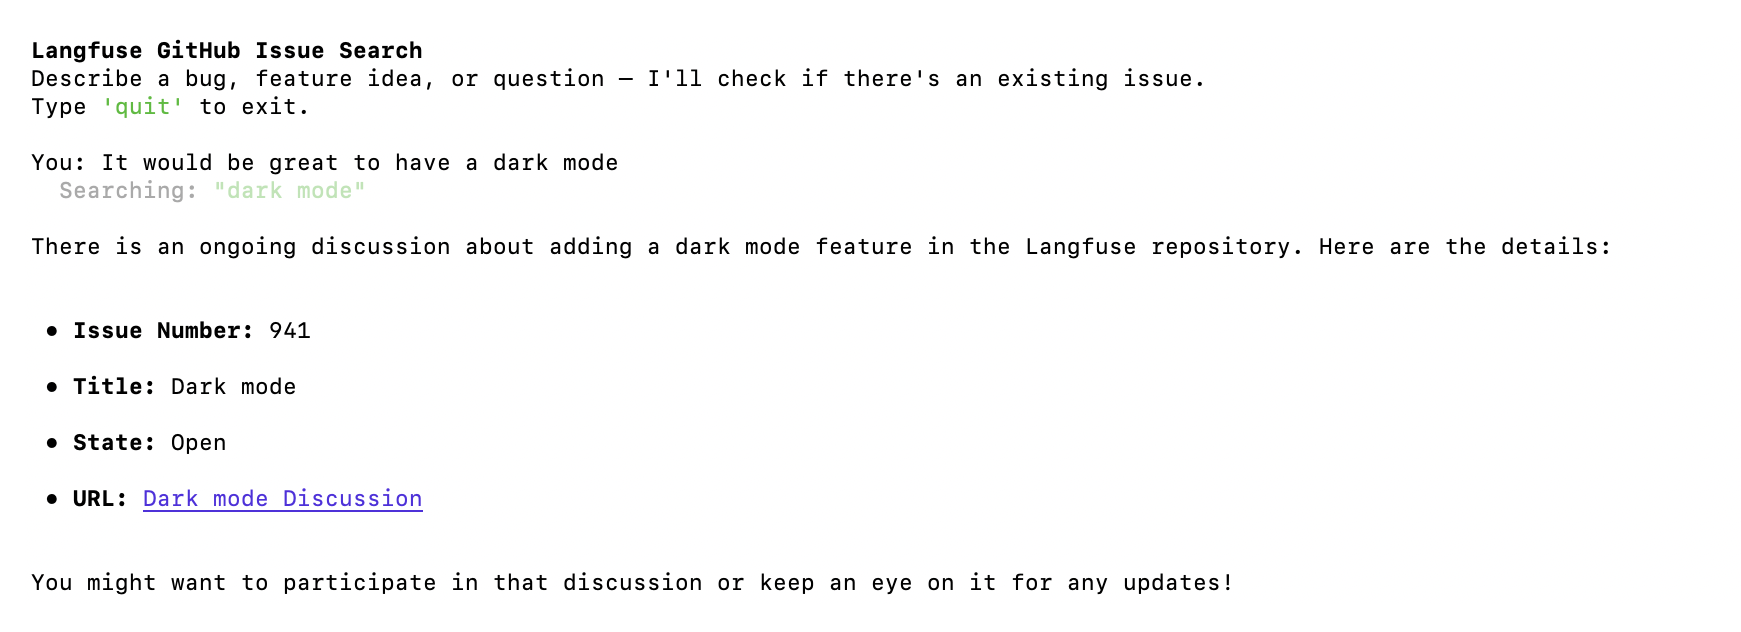
It fetches its system prompt from Langfuse, searches Github multiple times with different queries, evaluates the results and responds with the issues that are relevant. Every interaction produces a trace in Langfuse. You can find the full example repository here.
Example application code snippet
from langfuse import Langfuse, get_client, observe
from langfuse.openai import OpenAI


# using the @observe decorator to trace the function
@observe(name="github-issue-search-bot", capture_input=False)
def handle_turn(client: OpenAI, console: Console, messages: list):
    # Take the user's message as the trace input instead of the function's input parameters
    get_client().update_current_trace(input=messages[-1]["content"])

    while True:
        # This call is automatically traced by the Langfuse OpenAI wrapper
        response = client.chat.completions.create(
            model="gpt-4o-mini",
            messages=messages,
            tools=TOOLS, # tools are defined earlier in the code
        )
        choice = response.choices[0].message
        messages.append(choice)
        if not choice.tool_calls:
            break
        tool_results = handle_tool_calls(console, choice.tool_calls)
        messages.extend(tool_results)

    return choice.content

def main():
    langfuse = Langfuse()
    # Fetch the prompt from Langfuse
    prompt = langfuse.get_prompt("github-issue-search", label="production")
    system_prompt = prompt.compile()
    messages = [{"role": "system", "content": system_prompt}]
    # ... conversation loop
Let’s Dive In
Before you start, you need to have some traces to work with. If your application isn’t live yet, you can manually enter a few inputs to start with. In my case, I ran the chatbot with about 10 different inputs to cover a range of cases: feature requests, bug reports, off-topic questions, and some that were intentionally vague.
1. Go Through your Traces and Annotate
Looking at the traces, there are likely a few things you notice right away. Some are clear mistakes, in other cases you only realize you want a different behavior while reading the trace. You’ll have many scattered feedback points, which you want to write down somewhere so you have a log of things to tackle.
You can do this in Langfuse with scores and comments. I like to create a few score configs for the broad categories of mistakes I see. In my specific case, after looking through about 10 traces, three categories emerged that I created score configs for:
response-not-relevant: the bot returned results, but they didn’t actually answer the user’s questionoutside-response-scope: the bot tried to help with something it shouldn’t have, or made claims it couldn’t verifybad-search-results: the search queries themselves were off, missing obvious keywords
You need to create score configs in order to manually annotate your traces with these scores. See manual scores via UI and how to create and manage score configs for details.
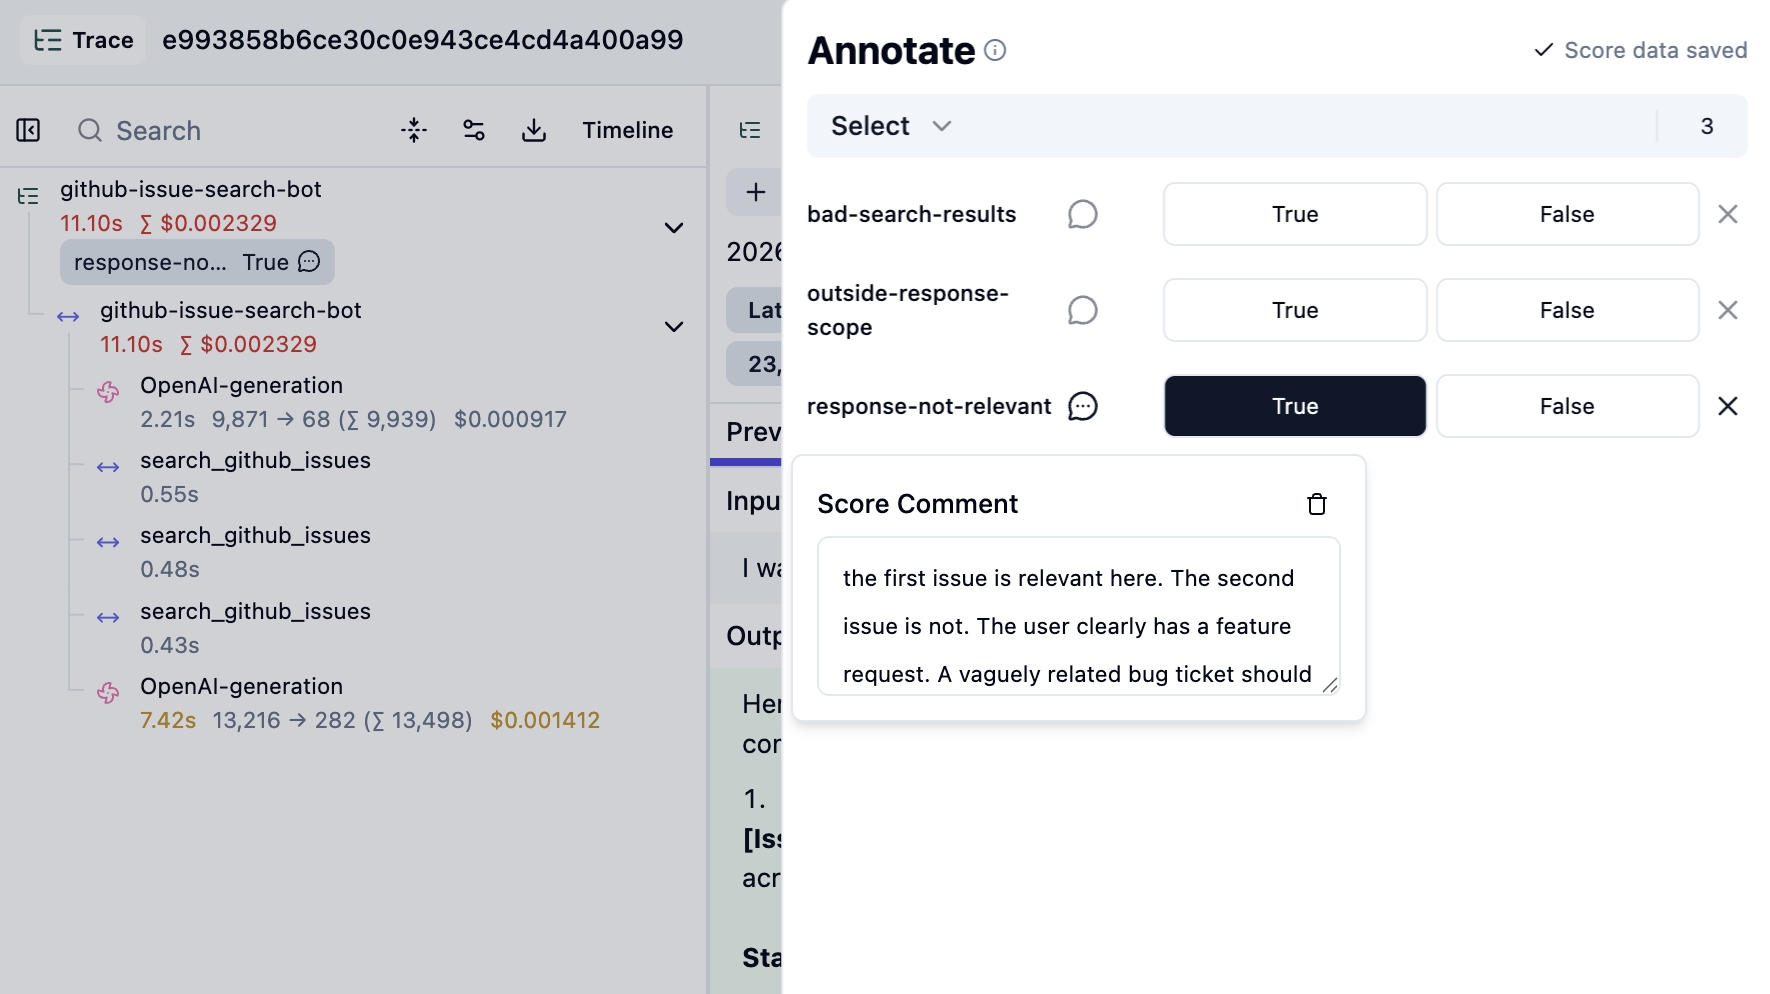
Every time you notice something, annotate the trace with the relevant score and add your specific feedback as a comment. The score gives Claude the category, the comment gives it the reason why, which is what you want Claude to address later on.
You don’t need to score every trace. Just the ones where something is clearly off. I scored 8 out of roughly 10.
2. Analyze with Claude
After some time, you’ll have a good collection of feedback to work with. Where in the past you might have manually started working through these points, you can now ask Claude to do a lot of the heavy lifting.
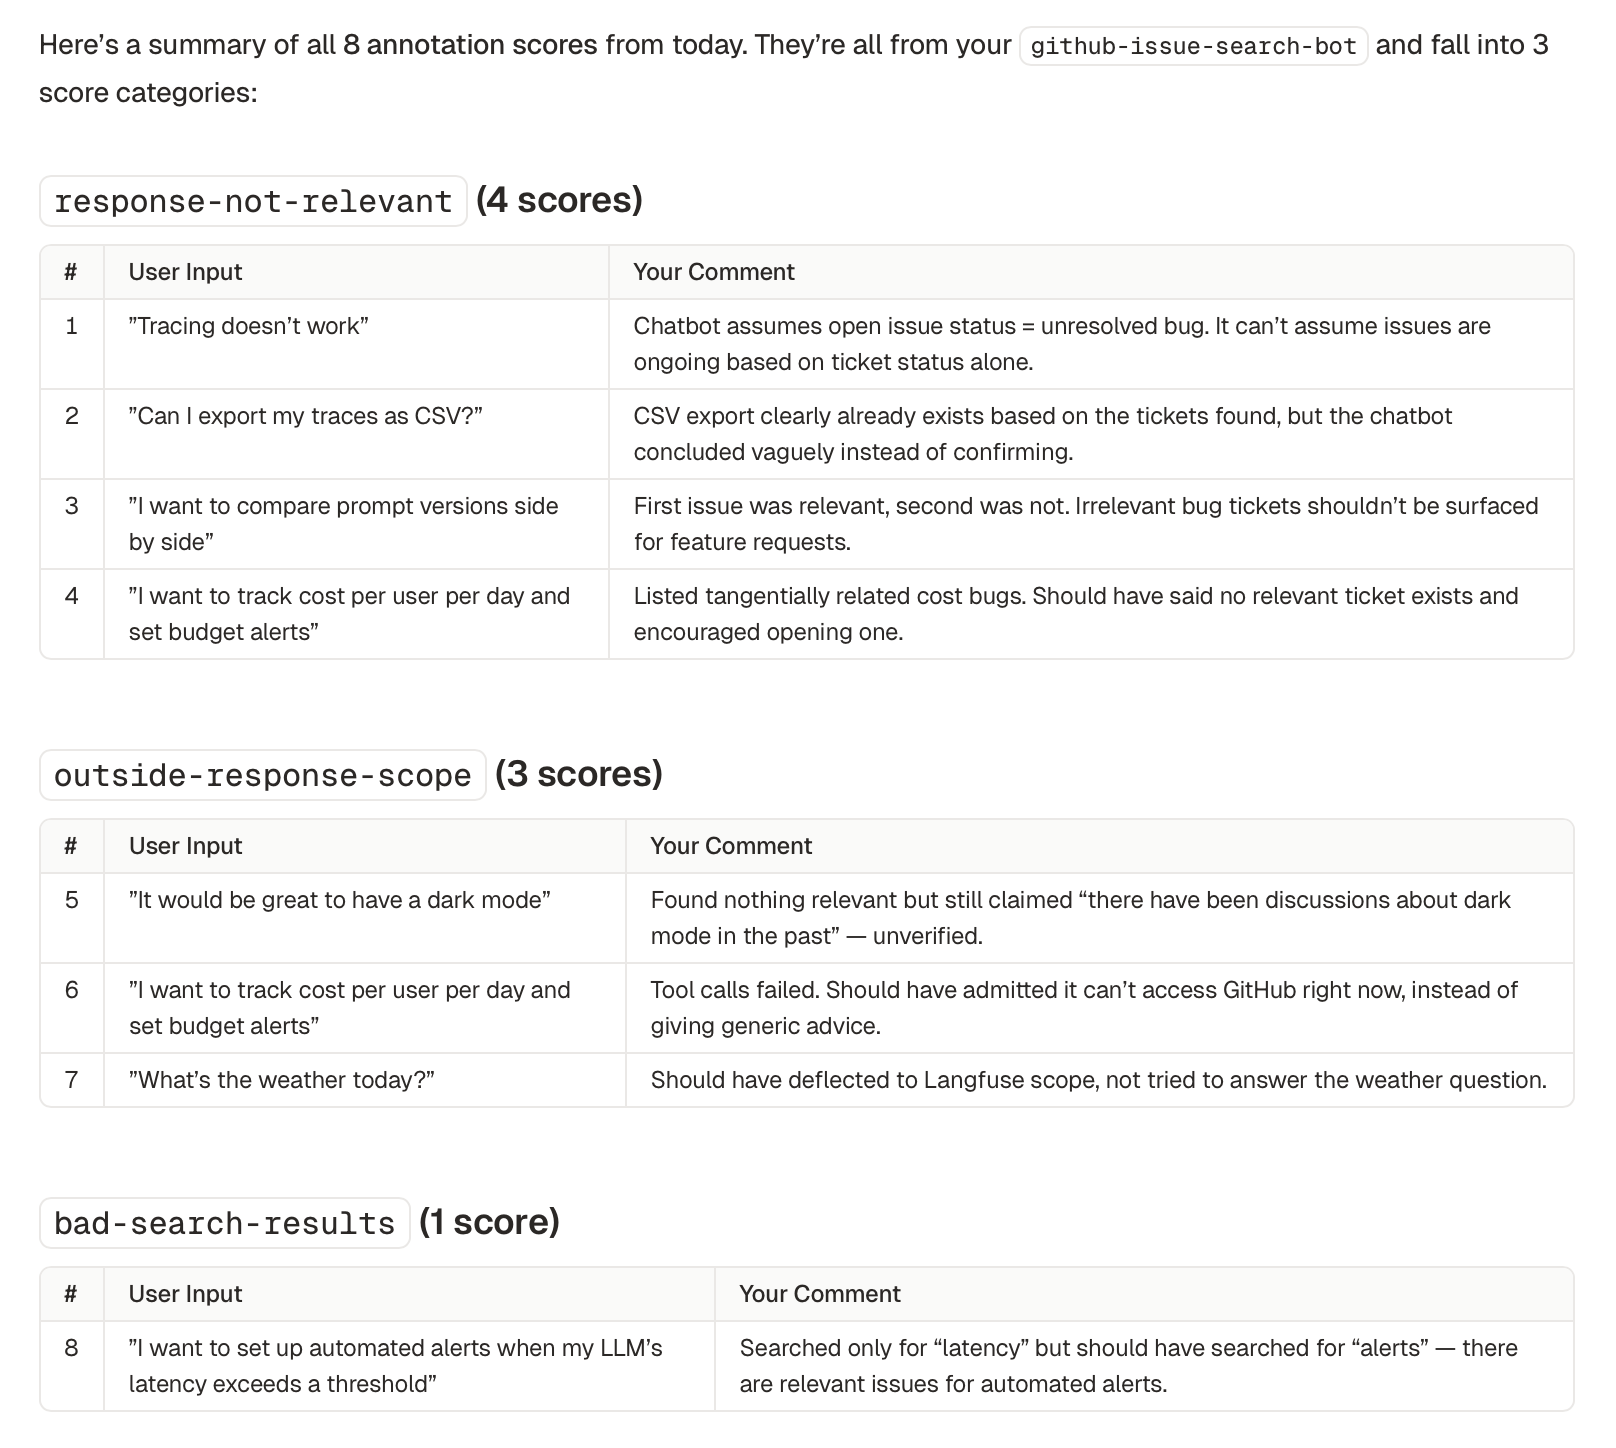
I asked it to fetch my scores:
Retrieve all scores that were created today. For each score, include the score
name, any comments left on the score, and the full content of the linked trace.
Claude pulls in everything via the Langfuse CLI and comes back with a structured summary:
Now ask Claude to look at the prompt itself:
Fetch the prompt linked to these traces. What gaps in this prompt could be
causing these issues?
Because our prompt is linked to the traces, Claude can fetch the correct version and analyze it. In this case it mapped each annotated issue back to six specific gaps. See the three first ones below:
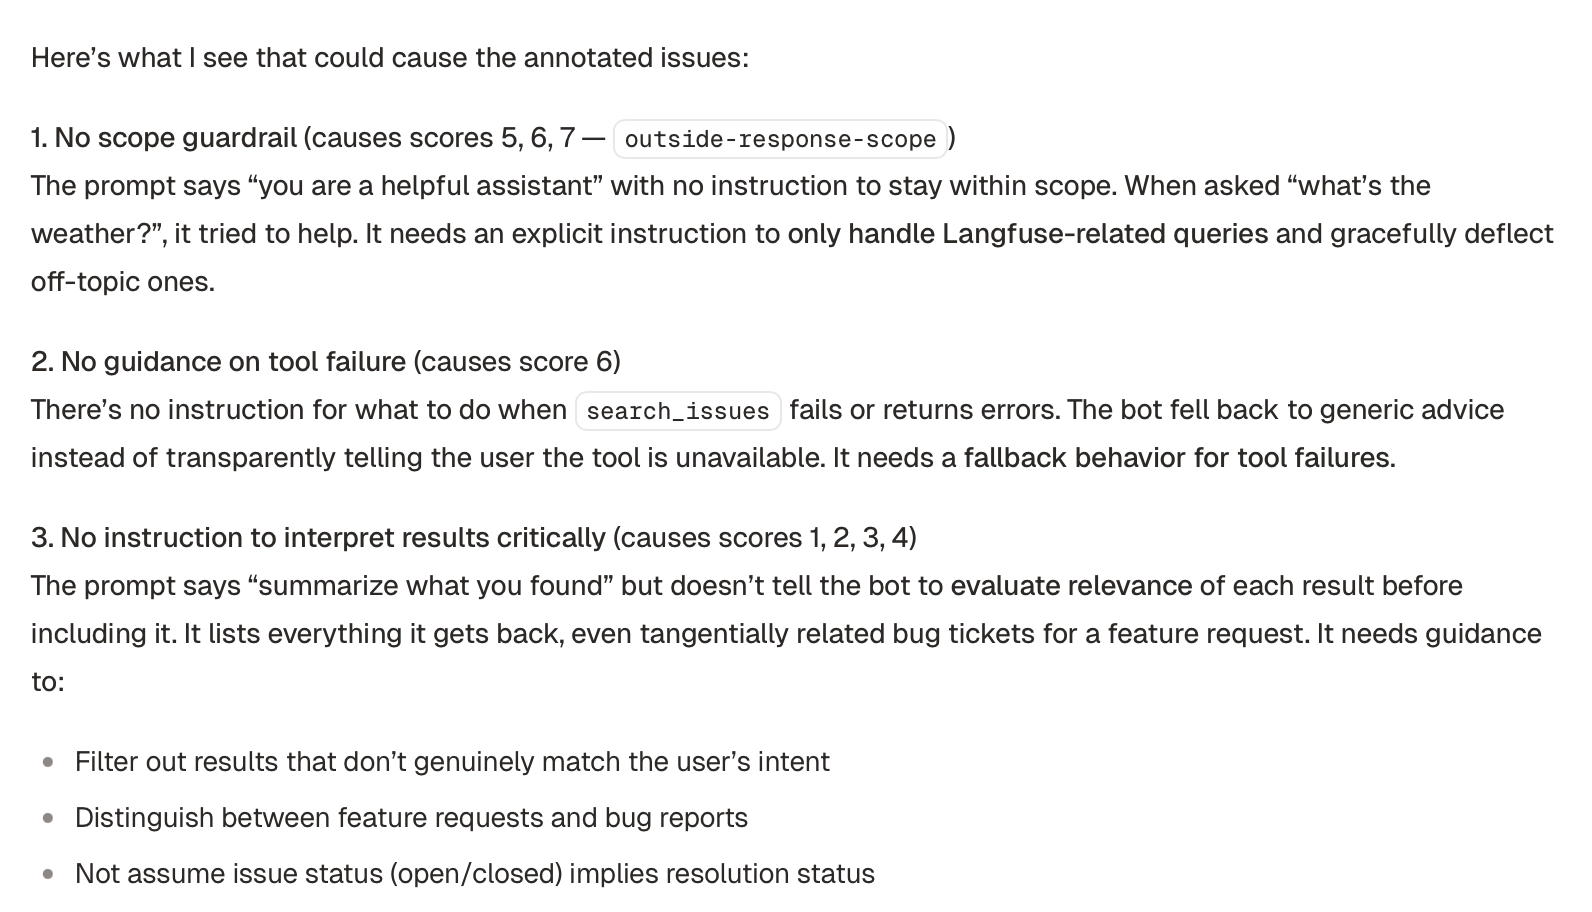
This kind of analysis across multiple traces would take a while to do by hand.
3. Improve the prompt
You can iterate on the issues Claude identified if you don’t completely agree with them. Once you’re happy with it, you can go into improving the prompt.
Propose updates to this prompt that addresses the issues above. Keep it concise;
group related issues into single instructions where possible.
Claude will propose a revised prompt. Once you agree with all changes, you can update the prompt. You can ask Claude to update the prompt in Langfuse for you.
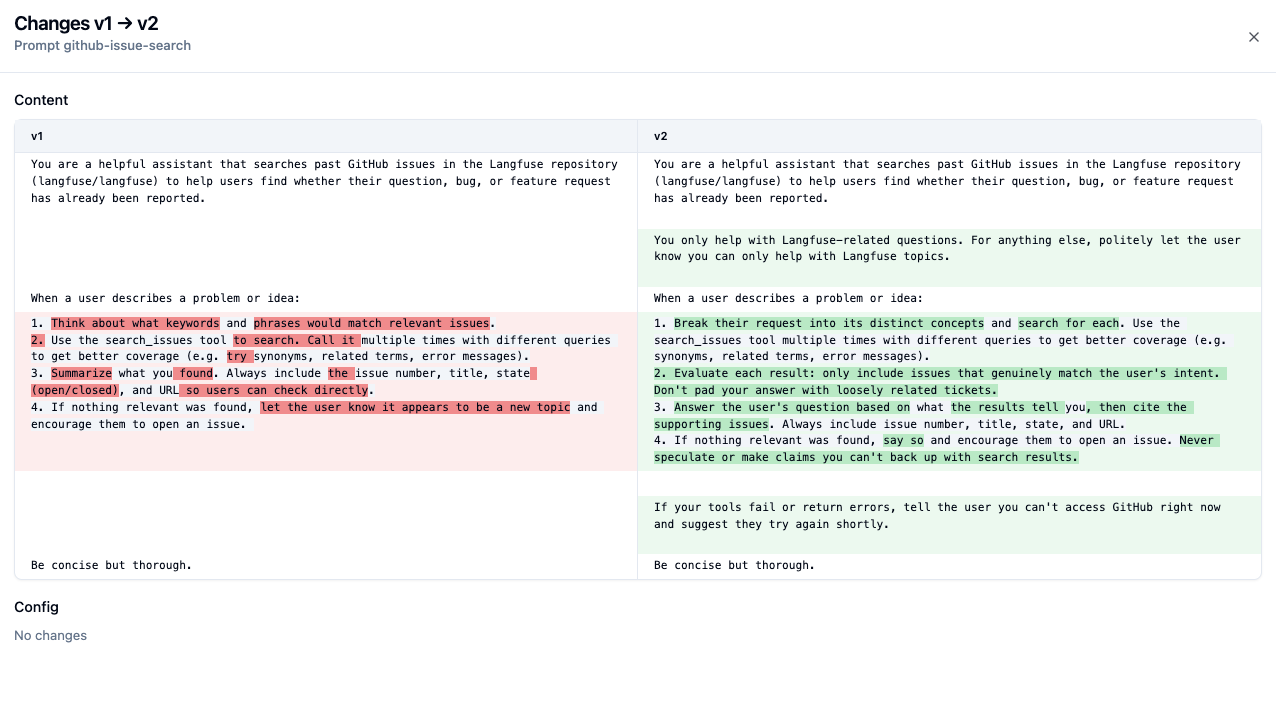
Update the prompt in Langfuse.
Here’s what the diff looks like in Langfuse:
4. Keep iterating
You can keep doing iterations of this loop until you don’t see any obvious issues. In my case, I did about 3 iterations, after which I was consistently getting good results on my small set of traces.
Variations
In this guide we manually annotated traces, but the same approach works with different sources of feedback:
- User feedback from production: If your app collects user feedback (thumbs up/down, ratings, comments), you can fetch those via the CLI and use them in the same way. Be selective though: not all user feedback is actionable, so you may want to filter for feedback you actually agree with before handing it to the agent.
- Annotation queues: If your team reviews traces through Langfuse annotation queues, you can fetch scores from a specific queue to work with a curated set of annotations.
- Experiment results: After running an experiment, you can fetch the scores and comments from that run.
What’s next
At some point, it will make sense to do more structured evaluation, to make sure your prompt changes are not causing any regressions on earlier cases.
One natural next step is to build a dataset out of the traces you annotated, so you can rerun your new prompts against this fixed set of cases. You can do this using the AI agent skill too, or you can use the Langfuse UI to create a dataset. Later, you can then:
- Run experiments: Use Langfuse experiments to compare prompt versions on your dataset, measuring accuracy, cost, and latency side by side.
- Automate scoring: Set up LLM-as-judge evaluators for your score categories, so you don’t have to review every trace yourself.